Few things in this world are more important to me than my Christmas village.
I realize that’s not a statement that instills confidence in my sanity or connection to reality, but it’s the truth and I won’t deny it.
Growing up in sunny Florida, Christmas scenes like the ones in TV shows, movies, and magazines were hard to come by. It made me feel robbed in some ways of the true Christmas experience.
For a while, my parents placated my pleas for white Christmases with snowglobes, but that didn’t last. Not even the best of snowglobes could fully capture the Christmas world I desired.
So around the time I turned ten, my mom took me to K-Mart for the purchase of my first little porcelain houses.
Those first years, my village was barely a blip on the map.
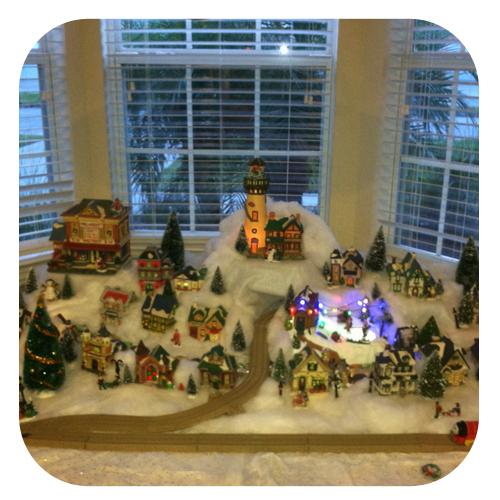
Five tiny buildings and a lighthouse covered in snow glowed from the surface of the dining room sideboard for years. We couldn’t afford more than one addition per year, so growth was small.
And even what new buildings we could construct had to come from the low rent K-Mart district. Nothing like what you see from Department 56 or Lemax was even remotely possible for my budding town.
But by the time I moved back home after college, everything had changed. The Dollar Tree got in the Christmas Village game and suddenly, my miniature city planner dreams were within the reach of my little budget.
In the last three years, my village has exploded without bankrupting me in the process.
I look forward to constructing my village all year — so much so that it is my birthday gift to myself every November, ensuring that I have it up and glowing before my big day on November 11th.
Friends and family have come to admire and love my village as much as I do, so I thought I’d share some key tips for recreating a village in your own home (while still being able to buy gifts for your family and friends!).
1. Create your base from Dollar Tree Items
 Every village starts somewhere, right?
Some people build elaborate styrofoam molds for their foundation, but I haven’t reached that level yet. Still, I know it’s important to give myself a clean canvas for construction.
So I begin my village with a simple white, plastic tablecloth from the Dollar Tree (it covers your table top and blocks the view of cords running from the tabletop to your wall plugs).
On top of the tablecloth, I lay my first blanket of snow with those cheap, sparkly sheets also found at Dollar Tree. They don’t look great, but by the time you cover them with buildings, trees and puffs of fluffy fake snow, no one will notice.
2. Be a “Make Do” Christmas Village builder
You’ll want to create some dimension to your village with a few mountains and hills.
Instead of crowding all your buildings onto one level, adding some “mountains” will give you tiers to create a display where all your buildings can stand out.
So how do you build mountains?
Easy — and free! You can easily use things you have on hand. You’ll be covering them with snow anyhow, so it doesn’t matter what the item is (just so long as you won’t be needing it until after your Christmas village is ready to come down for the year).
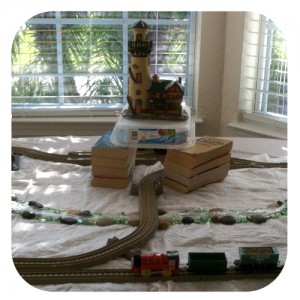
The boxes your buildings come in are a great resource for mountains. So are Tupperware containers, paperback books, and miscellaneous kitchen items like bowls and such. Just make sure you’ve got a flat surface so your building will sit on top.
When you lay out your village, use your found items to create a gradual rise in your tiers for a more realistic effect (and to make it easier if you’re using a connected string of lights).
3. Skip the Christmas train, go with Thomas!
Don’t get me wrong here — I love a good Christmas train.
I have a Christmas train that goes around my tree, blowing fake steam in the air and making “real” steam engine sounds.
But after fooling with cheap Christmas trains for my village over the last three years, I got smart and called in some assistance from my good friend Thomas the Tank Engine.
A few advantages to using Thomas over a typical Christmas village train:
- You can buy additional track as your village grows.
- The track is MUCH easier to put together and MUCH more durable than any Christmas train I’ve worked with.
- You can also purchase new trains, extra cars and other accessories to upgrade your train set.
- Thomas is a better investment because your kids (or in my case, nieces and nephews) will enjoy playing with your train year-round.
This is seriously a no-brainer, trust me!
I actually purchased a different train in the set than Thomas (I think his name is Charlie? Henry? I’m not sure) because it was red and thus more appropriate for my Christmas town.
4. Use one string of white, LED lights to illuminate you whole village
Forget the forty-thousand cords and the hot bulbs up against your fake snow.
It takes a little creativity and a tight layout, but it’s worth it to have one cord running off the table.
You can purchase a string of 20 white lights for about $5 and pop all your buildings onto the one string. If you have gaps, you can remove bulbs to create a break or cover the exposed light with some extra snow to give your village a little extra glow in the hills.
If the light cord doesn’t fit through the little notches on the bottom of your buildings, you can balance out the added bump of the cord with extra snow or the little gemstones you can pick up at the Dollar Tree.
In my village, I have individual bulbs going to my Walmart and Lighthouse, but all the other buildings are connected to one long string of lights.
5. Don’t be afraid to mix and match building sizes
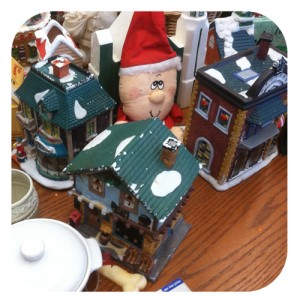 You don’t have to buy your houses all from one set.
Thrift stores are actually a GREAT place to find buildings for your Christmas village (and other items, too, check out this blog post with 6 tips for a thrifty Christmas village).
The picture here is from one of our local thrift stores — they had several buildings in great condition for a steal! Just be sure and ask if you can test them before buying and hold them up to a light to see if they’re porcelain (which will be brighter) or ceramic (darker, more like the cheap ones from the dollar store).
You’ll wind up with some size differences in your buildings, but you can mask that by using your make-do mountains to create perspective. Place bigger buildings in the front of your village, with the smaller ones up on a tier toward the back creating some distance perspective.
It’s super easy and will lend an eclectic feel to your Christmas village!
6. Add a water feature without using water
The stream running through my village has the look of running water, but in fact it’s made in about five seconds using an item we all have on hand in our kitchen: plastic wrap.
Take a long strip of plastic wrap and scrunch it up into a narrow tube. Wind it through your village like a babbling brook (hint: it can be a great way to cover exposed cords and such, too).
You can anchor your stream with some river rocks from the Dollar Tree and make it a little more realistic by adding a bridge or two (also available in the village accessories from Dollar Tree).
7. Use touch-up paint to add flair
Some of the Dollar Tree houses can be a little sad, but you can perk them up with some new paint.
You can paint over building labels and rewrite them (some of the Dollar Tree houses have scrawled, barely legible signs for their store names), fix any chips/scratches or enhance some features.
For example, my nicer homes from the early days of my collection have glitter in the snow. I used kids’ silver glitter paint to add the same effect to my cheap, dollar store houses.
Bonus Tip!
One more thing — even though you’re on a budget, you should splurge on one thing every year.
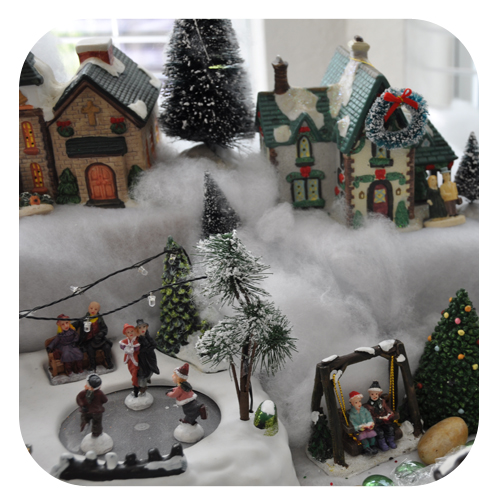
I bought my animated skating rink two years ago and its since become the the centerpiece of my village. It was a Walmart purchase, but if you were feeling especially Daddy Warbucks-ish you could make a trip to your local Michael’s for a cool animated item, accent piece or other feature to add to your village.
Most of all, you village should be a fun addition to you holiday decorations that the whole family can enjoy!
Check out this video of my completed Christmas village:








I really love your village!!! I am trying to make one this year on my own….I really like your stream…Where did you get the Thomas train set? I really like the tunnel. Hopefully mine will turn out as beautiful as yours…
Thanks Kelly! I got my Thomas train set at Wal-Mart actually, and they also sell expansion packs so if you want more tracks you can expand (something I’m thinking about to go to the next level this year!). Good luck with your village!
Shannon thanks for all the great tips. I bought a Thomas train for my village this year and made a tunnel. Works beautifully, easy to setup and the perfect size! The stream idea looks fun, I probably will add that next year. You’ve done such a great job with yours, love the video. So helpful!
Thanks for sharing!! I’ve worked on my own cheaper version since 1984—I love your “Thomas the Train ” idea. Your set up has inspired me for new ideas. The grandkids are coming tonight to help grandma set it up. You never know what the village will look like.. Thanks again.. (rummage sales are also good places to find one of a kind pieces at an affordable price)
Very nice and thanks for all the tips. I have had my village for about 25 years collecting, hope to get all set up beter this yeear with your tips,Thanks Again
Very nice and thanks for all the tips. I have had my village for about 25 years collecting, hope to get all set up better this year with your tips, Thanks Again
Thank you for sharing your passion! I have one question — are the Dollar Tree (Cobblestone) buildings “lightable”? I think they do not come with lights or holes in windows, but do you put the string lights inside those?
Thanks!
Happy Holidays.
I glue thumb tacks on the bottom of figurines to stand up straight and put right into styrofoam form base.
to make mts or tunnel – on the back side use lots aluminum foil ( to hold the body in place) spray paint all together with brown, green, blk spray paint on the dull side – then crunch up and form the tunnel or mountain-.
Iloved your village and your video. I started my village with three houses. Now I have seven houses. I got so many good Ideas from you I can’t wait to put up my small village. Thank You for your wonderful Ideas.
The Dollar Tree houses are lightable but they don’t glow as bright as the more expensive kind because they’re ceramic instead of porcelain. The light shines through the openings in the windows but not through the walls because the clay is so dense. I’ve toyed with the idea of taking a nail file and trying to make the openings a little bigger for more light, but I’m too scared to try it! Even on a $1 building. 🙂
Those are both excellent tips! I’m going to remember that for the next village go-around!
Cool ideas. I have had my village for quit a few years now. It has gotten big. I have to tell myself not to buy any more pieces. lol. I too go to the dollar store, k-mart, and such. Last year I got 20 house on ebay for cheat and they were in good condition and it had some 56 in there as well. I like your river idea, I use this blue like plastic rap that I found at the grocery store. It is located by the plastic bags and parchment paper. It works great and I can use it every year.
Thanks for the great info! I moved into my own apartment last year, and was lucky enough to do a Christmas tree with lights and a Lionel train. This year, I have added a few ornaments, a snow-covered platform for underneath, and a firehouse with a few figurines (I am a firefighter in New Jersey). It is going to look a little depleted, but I am truly looking forward to adding a little each year, and your ideas are great!
Hello from the UK, your Christmas village is sooo cool!
I only have 3 buildings but my collection is slowly growing! I have that train track as my boys are Thomas mad! The red one is James by the way 😉
I will take lots of inspiration from your awesome village, thanks for sharing!
LOVE your village – thanks for the awesome tips! BTW, according to my son, the red train’s name is James
For someone who wants to have a place for their ice skaters, but can’t yet afford the one you have … I plan to use an old (useless) CD as my “lake” and put a “frozen” fountain in the middle (where the hole in the CD is). I have a few skaters, but no lake for them … so this is what I will do for now.
One resource for styrofoam is our local Electrical Appliance store … they have to pay to have the packing taken away and disposed of, so they are thrilled to give it to me!
“Trees” will be real branches I will cut from our yard. I’ve seen limbs sprayed with fake snow used in flower arrangements at “Ikebana” shows, and also limbs with glittery areas painted on them with nail polish containing glitter, so between the two ideas I will some realistic “winter trees” to add to my scene. ALSO – the styrofoam base I am using will allow me to stick the trees in anywhere I wish, without having to worry about trying to support them.
Having recently purchased 6 large white plush bath towels (from COSTCO), I plan to use 2 of them as my “blanket of snow” over whatever base I put down. The edging on either end of the towels is perfect for making it look like a street or road with snow packed down from being driven over. I’ve been trying to find a small “old” car to add to the scene (on the “road”), but all to no avail until I saw a display of cars from the movie “Cars” … I bought the oldest model of those (can’t remember the character’s name) and considered buying the tow truck as well … but will see how the size goes with my scene before putting more money into it!
thank you. i have a huge display. started over 20 years ago when my oldest child was 3, my then husband bought me 3 houses from the dollar store. Since then, I have added two houses every year and this year I have added something new. plain birdhouse; the small ones, which look like townhouses. I have painted them and added them and now my collection has over 50 houses. i’m so excited to learn how to make water and plan on doing that this year with the light house addition. again a birdhouse…thanks and i’ll post pictures and videos later.
You inspired me to break out the Xmas village someone gave me years ago from Avon and set it up for the first time. I used your tips for Dollar Tree add-ons and a saran stream with river rocks, and it came out so charming, I love it!! Thank you!
Your village is very nice. I know this post appears from several years ago. Maybe we could have an updated peek at your villlage? I would like to see your new additions. It has been a long time since I put together my display (over 12 years) but excited actually started on it last week and the tips will be very useful. The stream in your village is my favorite. Thank you for taking the time to do the video as I found it very helpful.
Thanks for the ideas! I also used a paint pen to personalize the building signs, with grandkids names…for example “Stephen’s Garage”,”Delilah’s Pet Store”,”Clara’s Bakery”,”Chase’s Toy Shop”etc.
You could also use traditional C-7 screw in light strings, if one is missing the rest stay lit, ad you can just cut off any extra and put electric tape over the end.
What did you use for the snow? I love your idea for your stream of water! Would have never thought about it.
Thanks for you great ideas. I have a village that I inhearete from my x mother in law when she passed. It’s all the retired Charles dickens by dept 56. Each year my husband gets me a building or 2 for my birthday. My son will get the ones from his grandma and my daughter will get what her father bought for me.
I display mine on a 15foot mantle in my living room. It’s getting to large now so I will have to make a new place this year. However here are some times I picked up over the years.
To make height in the village I use pieces of wood scraps. We have a local furniture manufacturer that will give them away. So I get pieces in different thicknesses and place under the snow. I make sure the pieces are larger then the house to add trees and such.
As for the cords. I use a 8 foot long power strip from harbor freight. Plug each house in. And I can pull 1 plug to turn it all off.
I use a white piece of cloth as the base and then place the items on top. I have a mirror as my skating pond. This was the original part with Blythe pond back in 1980’s.
I create different variations of color with the bulbs I use in the houses. Yellow make excellent candle lighting, white is very bright, I use red in the pub. I have a church from the snow village that has a glossy finish and a set of trees that match so I put green in the trees.
To make fake snow I take a sheet of styrofoam from a craft store. Make sure it’s the roughest one. Break it in 2 inch wide strips and use a box greater on it. Works great. Plus it’s what they sell in the bags at the craft store or dept 56.
Water is made 2 ways. You can use the plastic wrap. But if your creative or have a hubby that can use a caulk gun buy clear silicone or elmers glue. Mix in food color to desired blue color and pour onto the base. Mine is on a thin sheet of styrofoam. You can dig the styrofoam out a little to create a bank. If you change your village for the seasons (some people do) use acrylic paint to add dirt or grass around it.
The foam in the cans for sealing cracks can also be used to make mountains. Just spray it into a heap let it expand and paint. For a sturdier mountain form with newspaper wrapped with chicken wire then spray the foam. Paint.
Make a pond. Take disposable pie pan fill 1/4 or so with clear acrylic tinted with blue paint. Once it’s solid pop it out.
I make roads and walls using fish tank gravel. From dollar store or Walmart. To form then use small rectangular molds. Make from think foam core or even wood. Fill form with stones then poor clear acrylic or elmers glue over them till mold is full. Once dry pop out. Not if using cardboard I would coat it with a non stick spray or petroleum jelly.
Cobblestones or brick paths can be painted on cardboard or directly on styrofoam as well. Modgepodge works great for these and water.
Also to help figures stand up I use tacky wax. You can get it any place they sell dept 56 items. It’s completely removable and sticks great. But if you can find it. Go to staples or office max and get sticky tack and use it. Same stuff only thicker.
I don’t have a train. So no tricks there. But hobby store that sell trains and stuff always have stuff for villages. Check their clearance isles.
I go to The Christmas Shop in pigeon forge once a year tobsee their display. So I can get new ideas and buy an accessory. I get all my pieces on eBay. I have the list of buildings and the MSRP when new with series and how many were produced so I don’t get ripped off.
I also check with the goodwill stores. I obtained 6 houses for 50 bucks 3 years ago. Someone had dontated them. Lucky day for me.
My advice is to have fun. Look around and be creative. Use what ever make you happy. I’m a village snob. lol I only want the dept 56 buildings. However I do get the others from Target for my sister who lost all her collection.
Feel free to email me. I’ll give you tips and tricks I have learned over the last 30 yrs.
Last one just came to mind. Quilt batting in white or even pillow stuffing makes great snow drifts. You can also comb felt to raise the pile and make it look fluffy. DONT ever use that spray snow in the can it will strip paint off the pieces.
Carliecat3@aol.com
just wondering about the lights that you use, you mentioned that you use only one strand of LED lights. Are they the small lights or larger ones, like the original lights that come with the houses? If you use the smaller lights how many would you put inside a house?
These are great tips. Def going to try making my own cobble street. I just started collecting two years ago. My kids are really enjoying it as well.
Love all the tips my original village was a costco set i got from my mom when i got married many years ago , I have bought additional villages to add a lighted carosel and church i also. Look. In dollar stores and ebay for my. Ponds and water I use alluminum foil. I do have some mirror lakes that i set up to. And an old ski mountain. my mom added to my. Collection. I. Found. This site trying to. Get ideas for keeping. The. Villagerrs up i will. Get. Some tacky wax. To use next. Year
I’m making a Christmas theme with houses, log cabin, and a church plus trees, etc. I’m making this on a tight budget. I’m using cardboard, foam boards, and BBQ wood chips (not cooked) using Dollar Tree paints and any thing your imagination will take you.
Thank you for all the tips. I e always wanted a village, but they always seemed too expensive. With all these ideas now I can start one. I do have a skating pond I received as a gift a few years ago, I gues that’s a good start.
Loved your ideas. My village buildings are handmade. Plastic canvas and yarn. Found some patterns during Covid. I even got brave and free handed planned and built my own house and both my sons’ . I am using some of your ideas – lights and plastic wrap for water, and hopefully a pond – but Thomas can wait til next year. Thanks
Love your village Shannon! Thank you for sharing your creativity! My husband and I are excited to try a few with our village this year! Hope you have a fantastic and blessed Christmas!!
Thank you for all of your tips and the video. I like your village. I too have started my own little village from thrift store finds, Habitat for Humanity finds, The Dollar Tree/Store finds and even a few paper pieces for background and one cardboard building covered with colored paper that my son made in grade school. It is no longer in the village because it finally had it’s day, but it was great in the beginning when I couldn’t afford anything. It was just that one and one ceramic lit little bakery from the local thrift store and each year, I too have slowly added. One thing I have used until I can afford a real pond with moving skaters is a round mirror and then I just put snow around edges, some lanterns, lights, lit trees, unlit trees and some skaters stuck on with sticky wax and it works and looks great. It’s amazing what one can do with a little thought and ingenuity. Thanks again, I too would like to see an updated version of your village. Merry Christmas and Happy New Year!
I am also a village snob. I have only two types,,,dept 56 and lennox. However look on Ebay for Dept 56 “retired” houses they are fairly inexpensive. I buy one or two every year. I have bought many.